Practical instructions for the features included in BoppiPaw, with clear boundaries between the theme, Core plugin and WooCommerce.
For BoppiPaw 1.0.0 · Illustrated edition · Updated September 11, 2026 · Admin labels are shown in English; translated installations may use different labels.
Real screenshots from the online demo administration. Open any image at full size to read the controls. Labels, versions and example values may differ on your installation; follow the steps rather than copying demo settings.
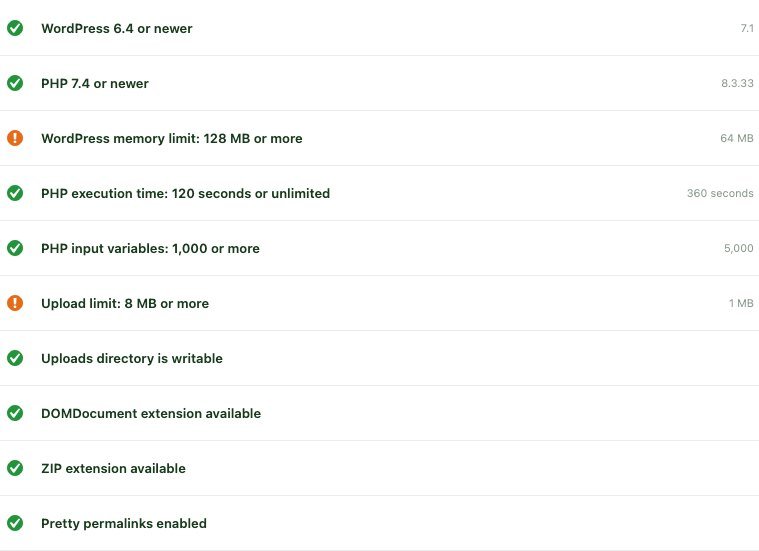
The theme declares WordPress 6.4+ and PHP 7.4+ compatibility. These are minimum theme requirements, not a recommendation to run an outdated server. Use a maintained PHP version that also meets your installed WooCommerce and Elementor requirements. Review the setup wizard’s environment results before importing.
Component
Purpose
BoppiPaw theme
Storefront presentation, Theme Settings, responsive layouts and builder integration.
BoppiPaw Core
Companion content types, custom editor components and supporting store tools. Keep it active for the intended demo experience.
WooCommerce
Products, inventory, orders, cart, checkout and customer accounts. Required for shopping features.
Gutenberg
The WordPress block editor. No separate page-builder plugin is needed.
Elementor
Needed for Elementor pages/templates. Elementor Pro is not included; its Theme Builder locations are a separate integration.
HTTPS, working file permissions and outbound requests are needed for online installation, updates and optional image downloads. Hosting limits affect imports and uploads.
Screenshot 1. Read the environment checksOpen Setup Wizard → Environment. Review each warning before importing; the values pictured belong to the example server, not recommended production settings. Ask your host to resolve insufficient memory or upload limits.Open full-size screenshot ↗
2. Install & run the setup wizard
Back up an existing site. Extract the full download and locate the installable theme ZIP.
Open Appearance → Themes → Add New → Upload Theme, upload that ZIP and activate BoppiPaw. Do not upload the outer documentation bundle as a theme.
Open BoppiPaw → Setup Wizard. Review the environment, optional child theme, page editor, plugins, demo and site settings steps.
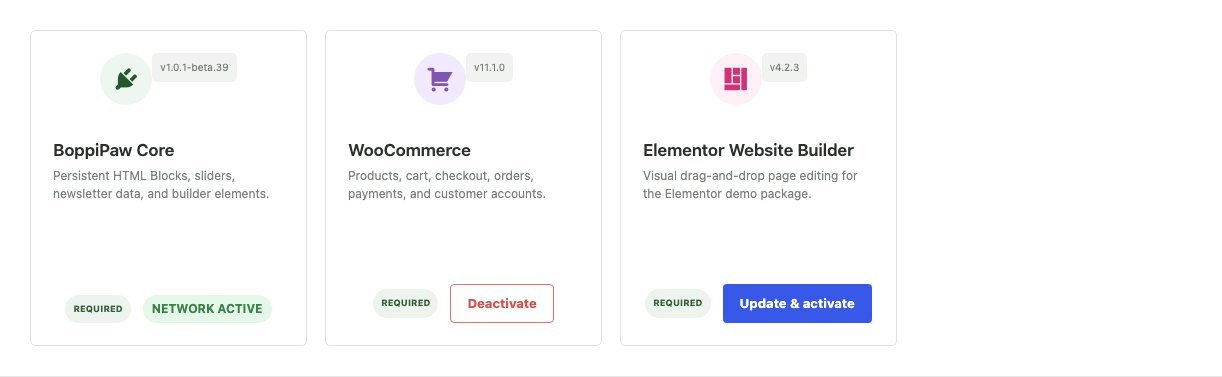
Use BoppiPaw → Plugins to install/update and activate required plugins. Verify the resulting status rather than assuming a click completed the operation.
Configure the site title, logo and menus, then follow the import tutorial.
The wizard remains available after setup. Permanent admin pages also let you change each area without rerunning an import.
Use a child theme for PHP/template customizations. The release directory is boppipaw. When migrating an older development directory, verify the child theme’s Template header before activating it.
Screenshot 2. Verify the required pluginsOpen BoppiPaw → Plugins. Core and WooCommerce must be active; Elementor is needed for Elementor content. “Network active” is the multisite equivalent of an active plugin. Do not deactivate dependencies after importing.Open full-size screenshot ↗
3. License & activation
Open BoppiPaw → License to view status and activate/deactivate this site. A valid purchase code is used for authenticated updates and protected downloads. Ordinary storefront use and Theme Settings are not locked behind activation.
Enter your own valid purchase code when available and choose the appropriate environment offered by the form.
Check the returned activation status.
Use the account/site-management link on the License screen to manage connected sites. Review the old activation before moving a production installation.
Activation limits and support entitlements follow your purchase and the license service’s response. Installing the theme is not evidence of a marketplace purchase or approval.
4. Tutorial: import a prebuilt website
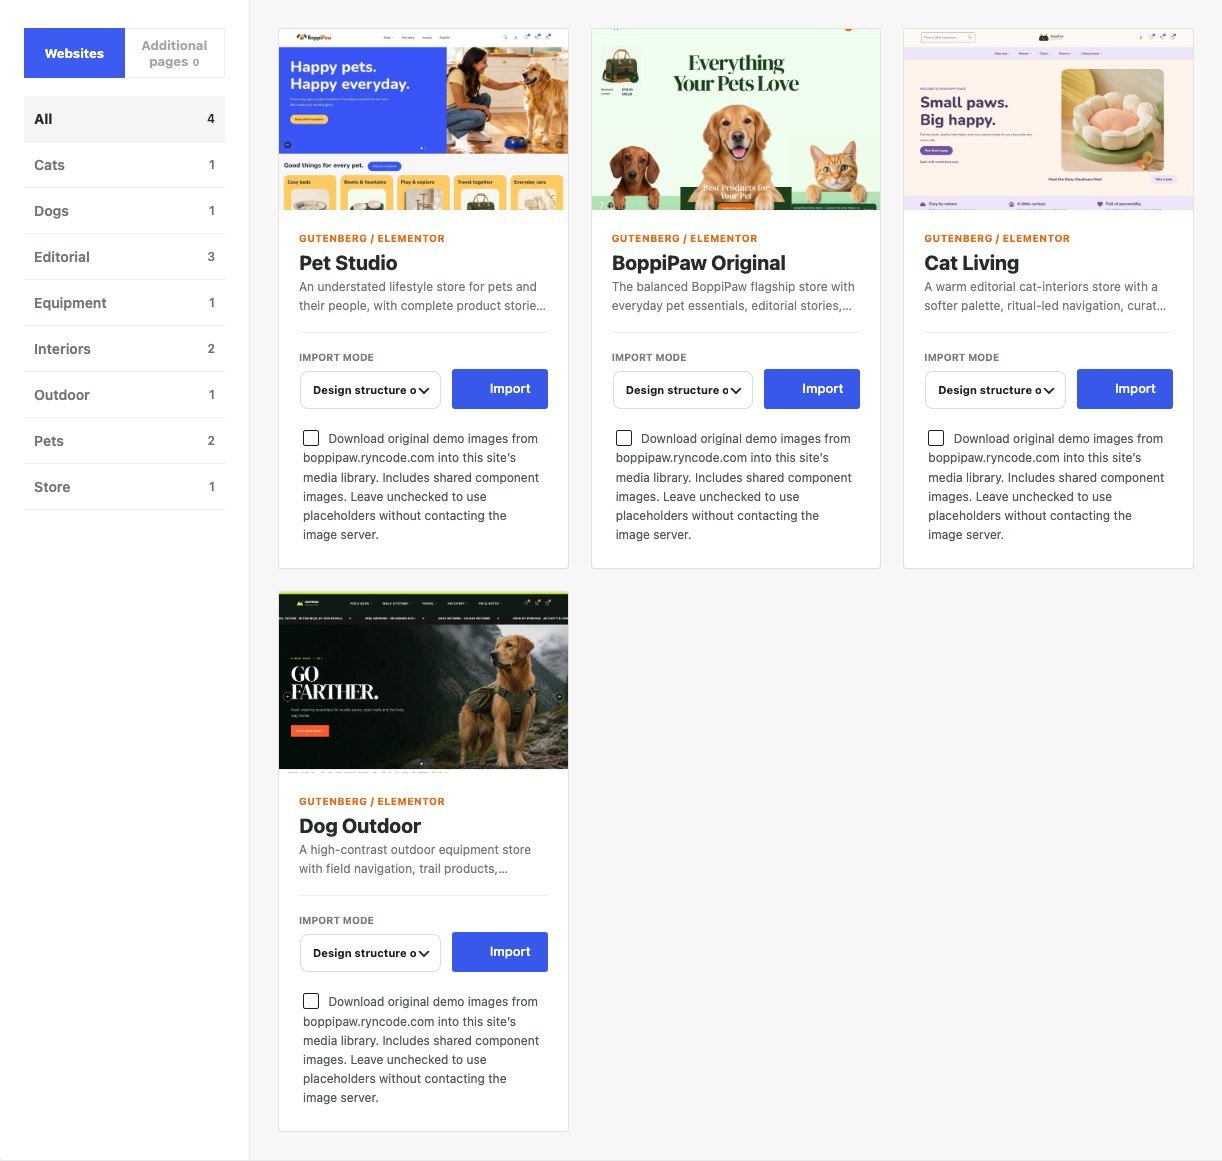
BoppiPaw Original, Cat Living, Dog Outdoor and Pet Studio include Gutenberg and Elementor import data. A demo is starting content, not a configured trading business.
Use a test site or take a full database-and-files backup. Imports can change the homepage, menus, options and builder assignments.
Choose the primary editor in setup or Theme Settings → Page Builders → Editor workflow. Activate required plugins.
Open BoppiPaw → Prebuilt Websites. Select a design and read its offered import modes. Design structure only and full-content modes do not import the same amount of data.
Decide whether to enable Download original demo images. Leave it unchecked for placeholders without contacting the image server. Demo photos are not embedded in the installable ZIP.
Start the import and follow progress. If interrupted, use the available resume action instead of repeatedly starting new imports. Keep the original image choice when resuming.
Check the imported homepage, menus, images, products and Header/Footer Builder default assignments on desktop and mobile.
Replace sample copy, prices, contacts and policies. Configure WooCommerce currency, taxes, shipping and payments yourself.
Imports do not transfer payment credentials, merchant accounts or your license code. Tracked import removal is not a full-site restore. Read its confirmation and, with multiple imports, work back from the newest import. Keep an independent backup before removing content.
Theme updates do not automatically overwrite existing demo pages. Reimporting is a separate content operation.
Screenshot 3. Choose the package and import optionsFind the intended demo, select its Import mode and decide whether to download original demo images before clicking Import. Check these controls on your chosen card—not another design. Wait for the completion result, then inspect the homepage and builder assignments.Open full-size screenshot ↗
5. Pages & editor workflow
Gutenberg and Elementor can coexist on different pages. Keep a saved page in the editor that created it; changing the primary editor does not convert existing data.
Open Pages and edit the intended page. Use BoppiPaw Builder Page for a full-width builder canvas.
Search the Gutenberg inserter or Elementor widget panel for BoppiPaw components. Core must be active for custom components.
Edit images, content and links in component controls. Product-driven sections also require published products and a suitable query/category.
Review tablet/mobile spacing, typography and visibility before publishing.
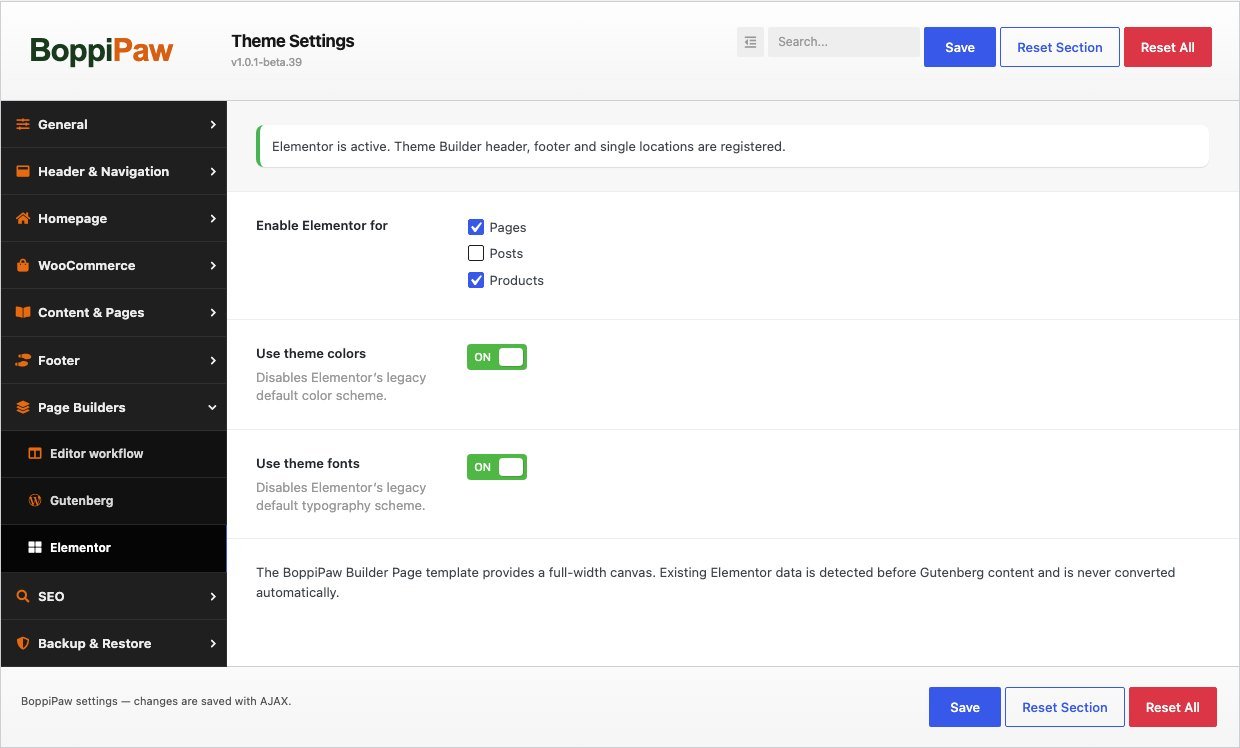
Enable Elementor for posts/products under Theme Settings → Page Builders → Elementor when needed. Builder descriptions do not replace WooCommerce price, stock and variation fields.
Screenshot 4. Keep Elementor aligned with the themeOpen Page Builders → Elementor. Select the content types you want to edit, enable theme colors/fonts if appropriate, then Save. Existing widget-level overrides still take precedence.Open full-size screenshot ↗
6. Tutorial: build a header
Open BoppiPaw → Header Builder. Create a layout or duplicate one before major changes.
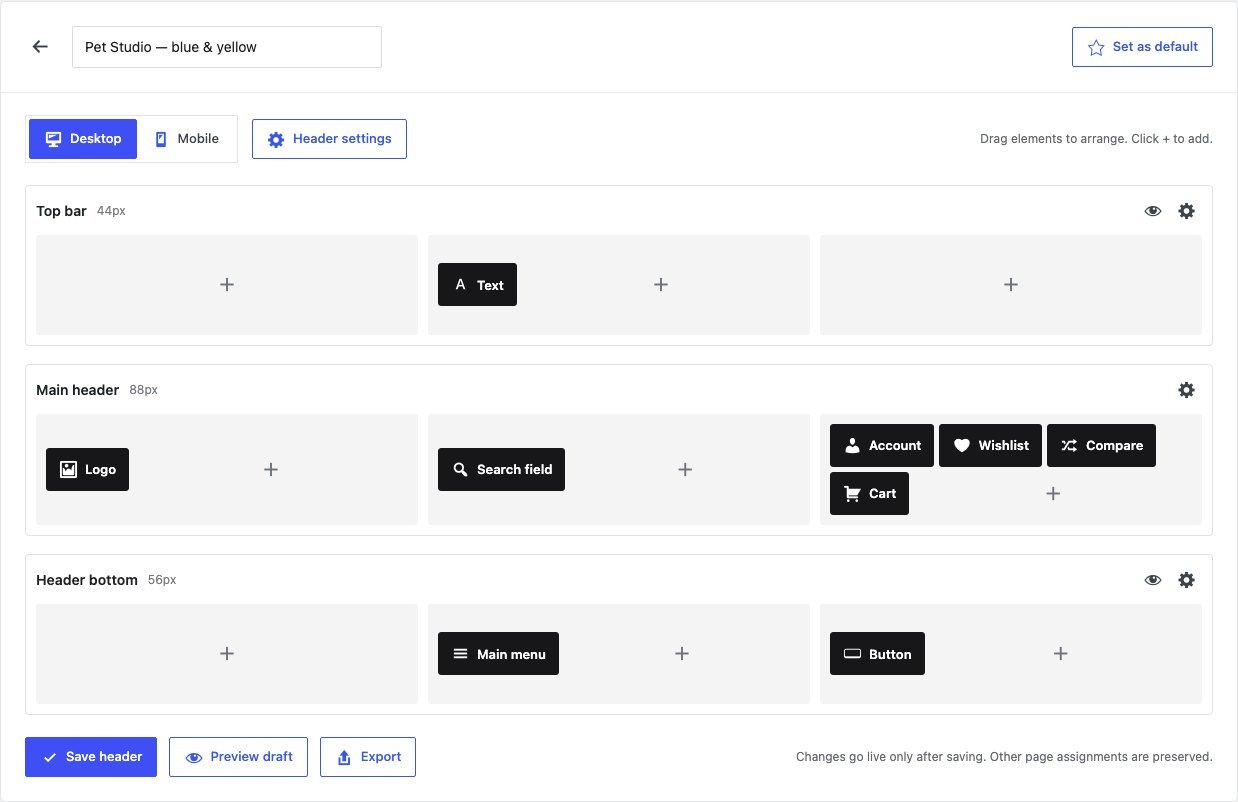
Arrange top, main and bottom rows across left, center and right columns. Configure row colors/heights and layout width/sticky behavior.
Add logo, main menu, search field/icon, account, wishlist, compare, cart, text, button or HTML Block elements. Configure their content and links.
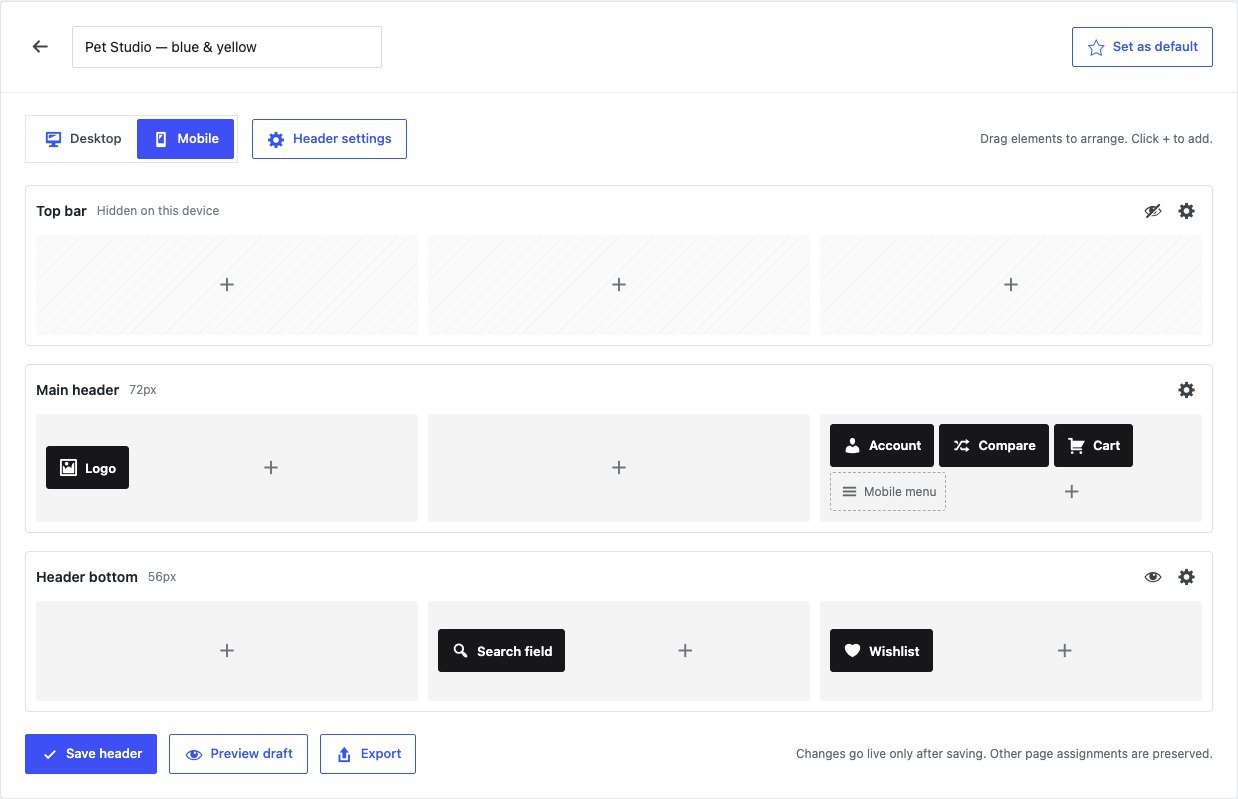
Switch to mobile layout. Keep it compact; do not duplicate every desktop control. Mobile navigation is supplied separately.
Save and apply the site default. Check the storefront with an open menu and after scrolling.
Use the builder’s export/import workflow to transfer configurations. Reselect destination media/block references where needed. A page, post or product can override the default in its Header & Footer panel.
If the header does not change, check page overrides and any active Elementor Theme Builder header. Elementor Theme Builder locations take priority. Missing templates fall back to the original theme layout.
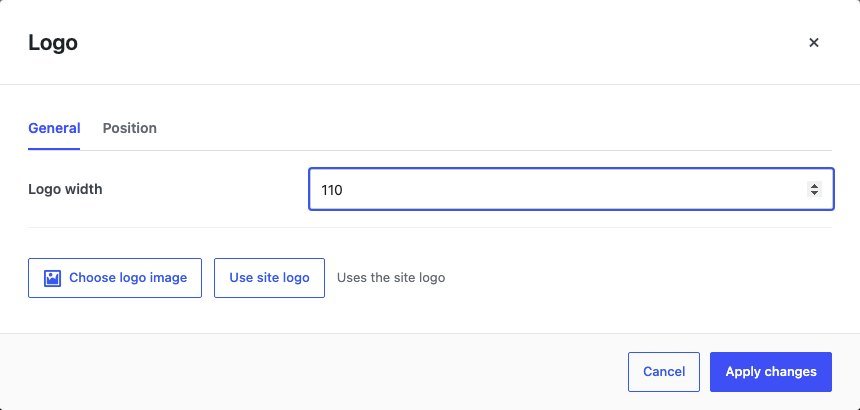
Screenshot 5. Arrange the desktop headerUse the + controls inside the three columns to add elements. Drag existing elements to reorder them; the gear beside a row opens its settings. Use Preview draft before Save header.Open full-size screenshot ↗Screenshot 6. Edit an individual elementClick an element to open its settings. For the pictured Logo element, choose the image and size, then apply the dialog changes. Finally save the header; closing the dialog alone does not publish the layout.Open full-size screenshot ↗Screenshot 7. Build the mobile layout separatelySwitch to Mobile and edit the visible rows. The screenshot shows the editing controls, not a recommended number of shortcuts. Keep this layout compact and move secondary destinations into the bottom navigation. Save and check on a real phone.Open full-size screenshot ↗
7. Tutorial: build a footer
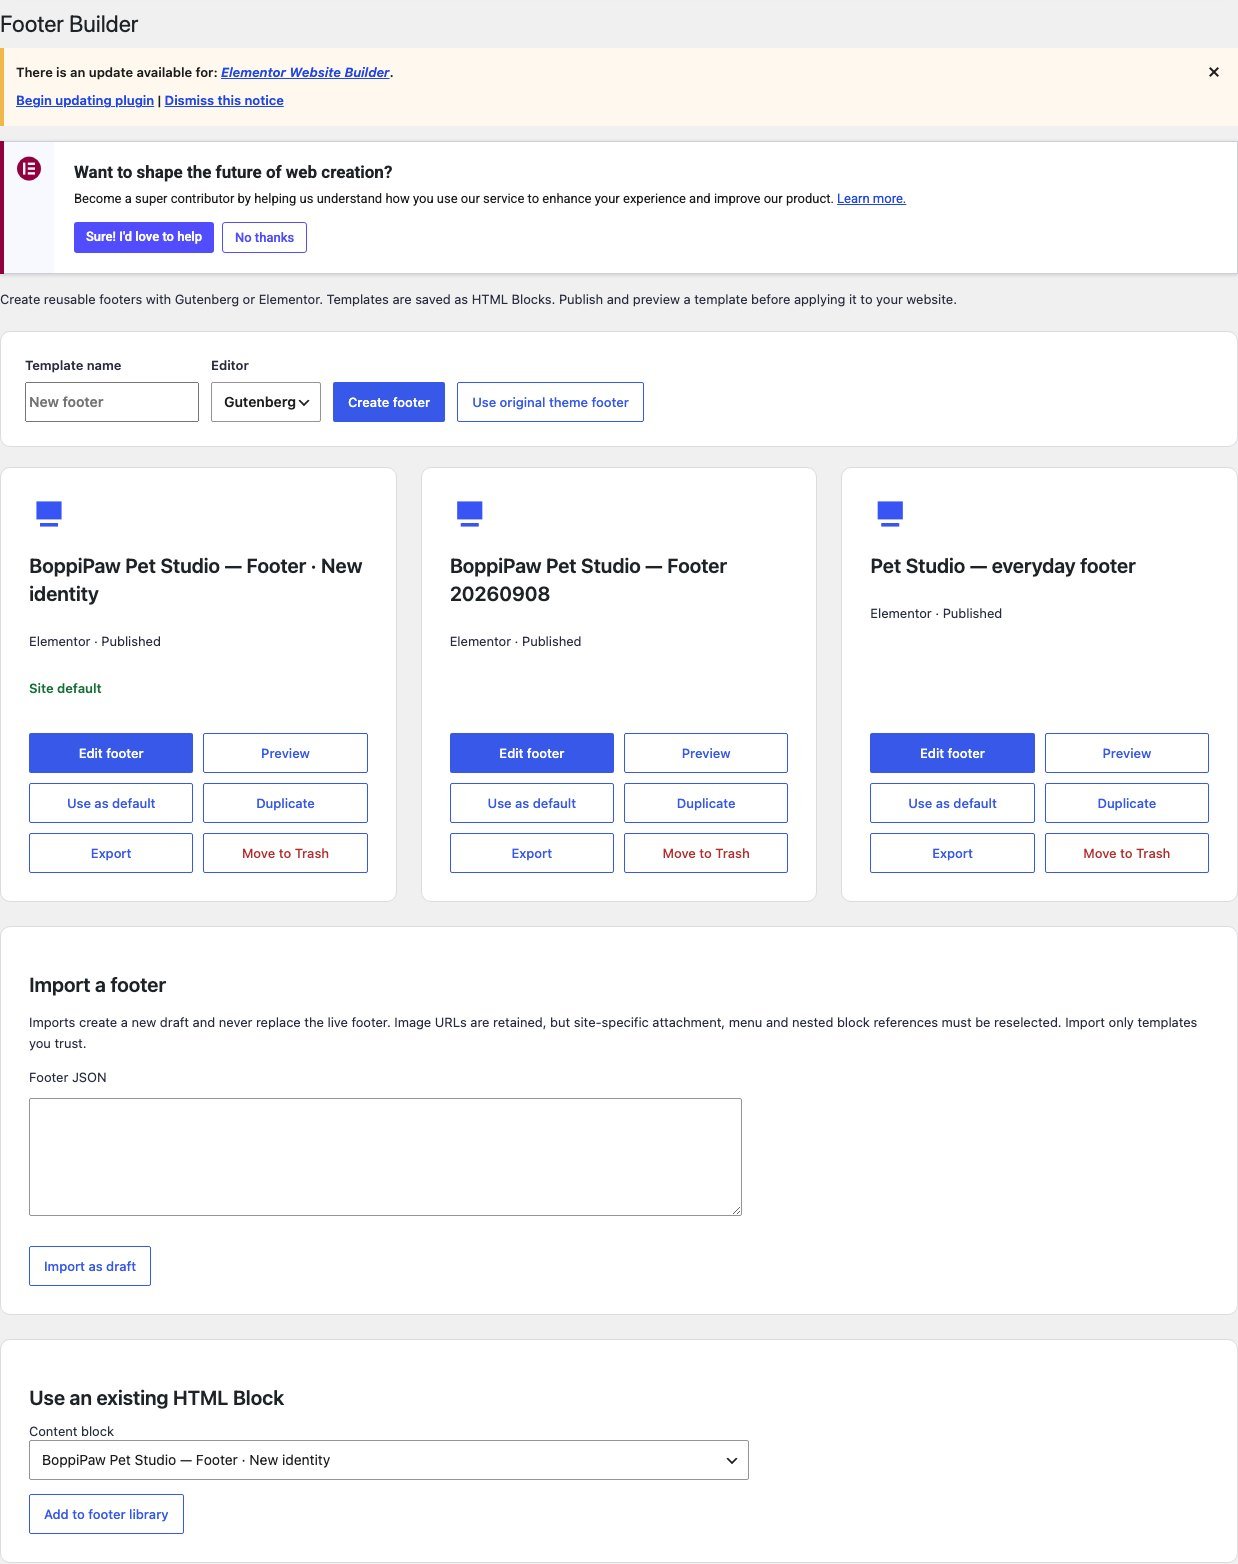
Open BoppiPaw → Footer Builder, enter a name, select Gutenberg or Elementor and choose Create footer.
Build its reusable HTML Block: logo, introduction, navigation, contacts, social links and newsletter entry point. Make link columns readable on mobile.
Publish, use Preview, then Use as default. A draft alone does not replace the live footer.
Check multiple pages and their Header & Footer overrides.
Templates can be duplicated, exported and trashed. Imported files create a new draft, not an automatic live replacement. Image URLs may remain, but attachment, menu and nested-block references need checking on another site. Import only templates you trust.
Use Use original theme footer for the fallback. Source/block selection is also in Theme Settings → Footer → Footer content. An active Elementor Theme Builder footer takes priority.
Screenshot 8. Create, preview and apply a footerEnter a template name and choose its editor in the top toolbar. Create footer opens the content workflow. Publish the block, return here, Preview it and choose Use as default. The Site default badge confirms the assignment; importing a file only creates a draft.Open full-size screenshot ↗
8. Tutorial: menus & Mega Menu
Create a menu under Appearance → Menus, add pages/categories and assign its location.
Create and publish an HTML Block for the rich panel. Add clear category links and optional promotional content in your editor.
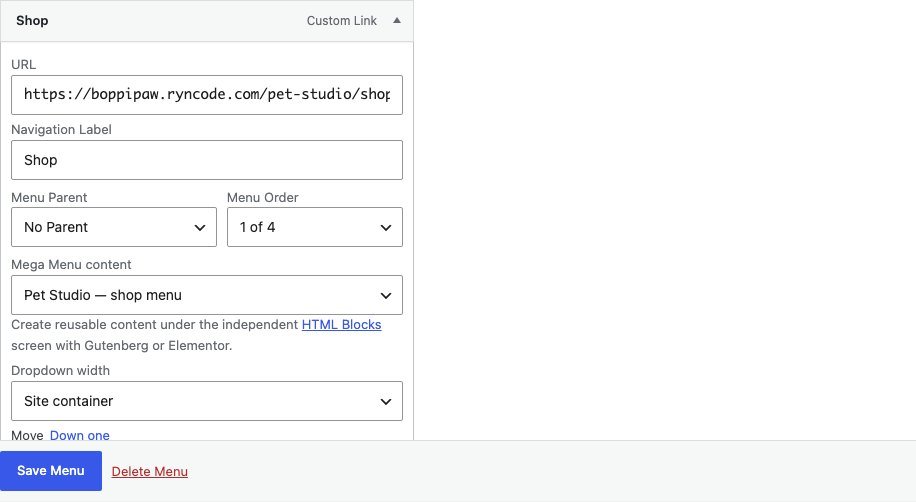
Expand the intended top-level menu item, select the block using its BoppiPaw Mega Menu controls and save the menu.
Check desktop hover/focus, parent and panel links, then mobile expandable navigation. Do not expect a wide desktop panel to fit unchanged on a phone.
Keep meaningful normal menu items/children. After transfer, check block references and publication status on the destination site.
Screenshot 9. Attach an HTML Block to a menu itemIn Appearance → Menus, expand a top-level item. Choose a published block in Mega Menu content and set the dropdown width. Save Menu, then test the parent link and panel links on desktop and mobile.Open full-size screenshot ↗
9. Preserve the Original design
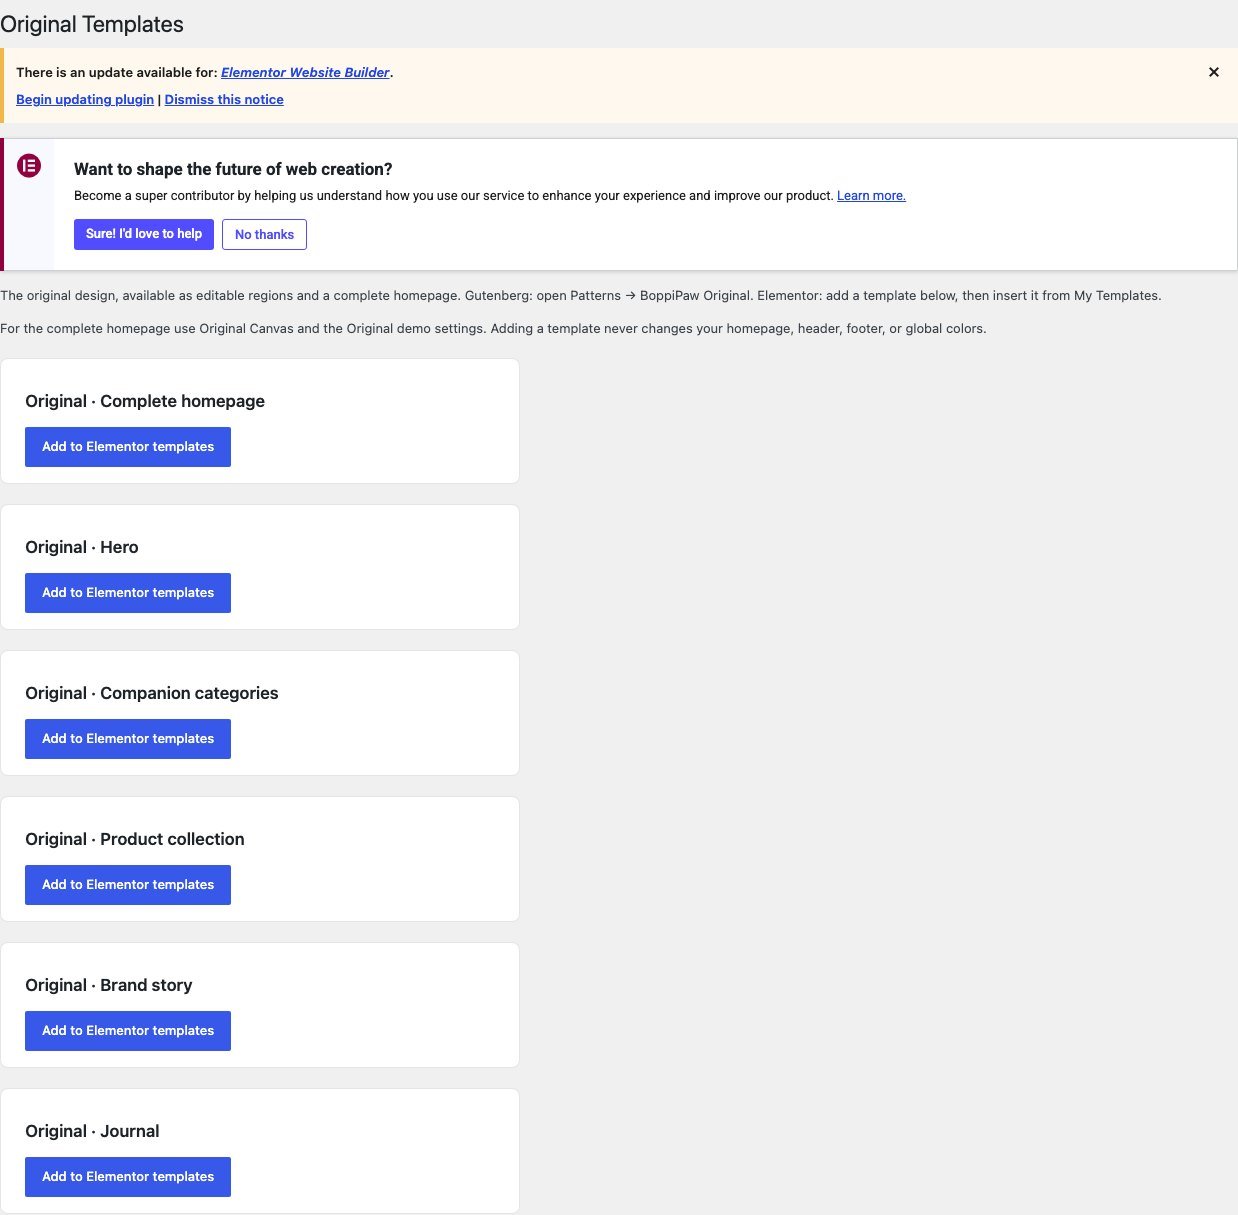
Original uses dedicated reusable sections and an Original canvas workflow to retain its frontend composition while supporting editor-based content and import. Use BoppiPaw → Original Templates and supplied components instead of rebuilding its overlapping hero as unrelated generic columns.
Choose the matching editor version, retain the section structure and edit exposed controls. Image proportions and transparent edges affect the composition; preview both desktop and mobile.
Updating the theme does not automatically replace an existing legacy Original homepage. Back up its page and settings before deliberately adopting an editor-based template.
Screenshot 10. Use the dedicated Original templatesOpen BoppiPaw → Original Templates and follow the Gutenberg or Elementor instructions shown here. Preserve the supplied composition and replace content through its component controls. Inserting a template does not automatically change the site homepage.Open full-size screenshot ↗
10. Colors, typography & branding
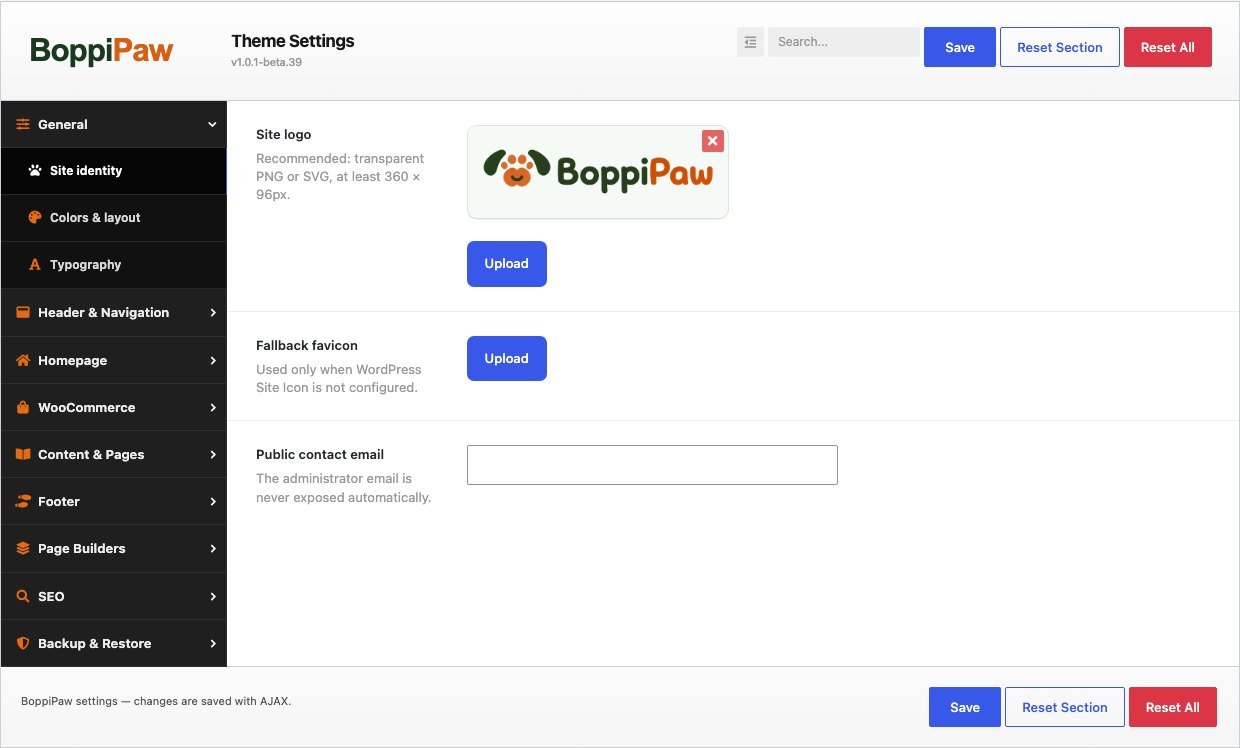
Start in Theme Settings with the logo, identity preset, brand colors, page background, supporting surfaces, body font and display font. “Brand orange” and “Brand green” identify color roles; choose your own colors.
Theme backgrounds apply to theme-rendered archives, forms and surfaces. Builder sections may have independent colors and typography. If shop/account pages differ from the homepage, review global theme settings. If only one section differs, inspect its local controls.
Enable Elementor theme color/font inheritance where appropriate and remove unintended widget overrides. Explicit widget styling is not automatically replaced by global settings. Use a high-contrast footer logo and configure WordPress Site Icon separately.
Screenshot 11. Set your site brandingOpen Theme Settings → General. Upload your Site logo; configure the WordPress Site Icon separately. Save and check the storefront. Footer logos and locally styled builder sections may need their own changes.Open full-size screenshot ↗
11. Tutorial: a compact mobile storefront
Simplify mobile Header Builder rows. Keep essential controls; add a separate search row only when useful.
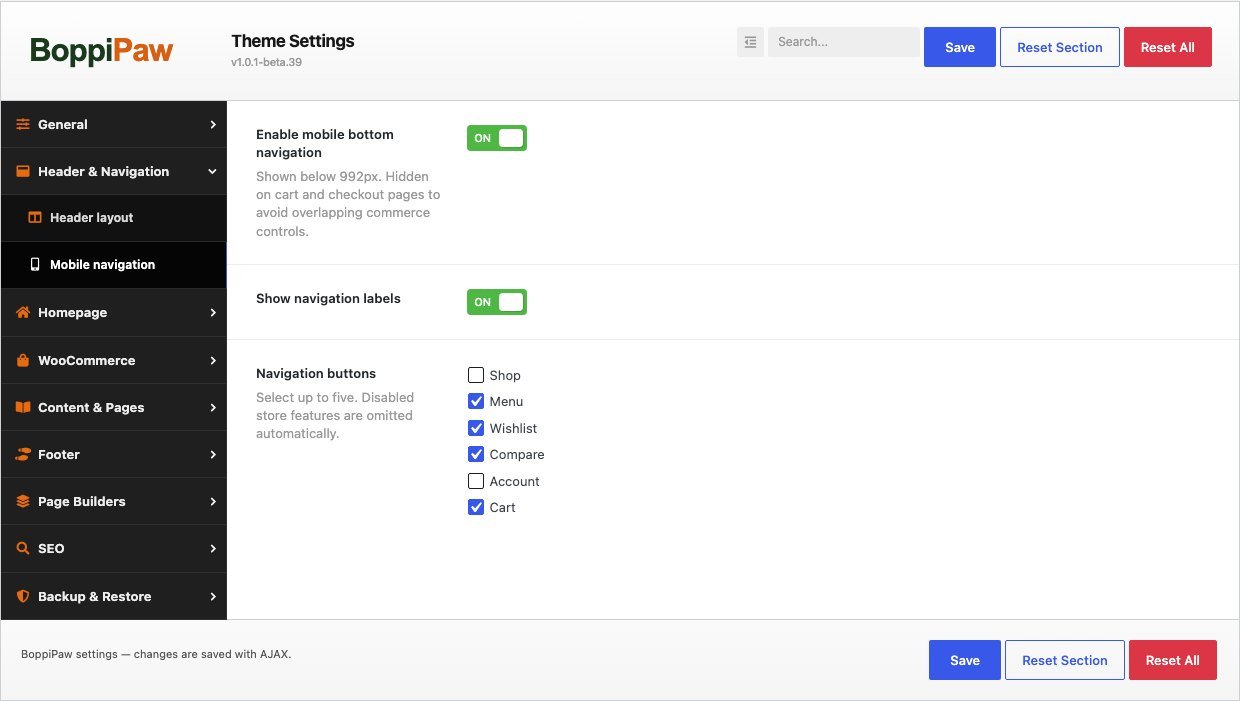
Find Mobile navigation under Theme Settings’s header/navigation settings and enable mobile bottom navigation.
Select up to five items from Shop, Menu, Wishlist, Compare, Account and Cart. Choose whether to show labels. Disabled store features are omitted automatically.
Remove unnecessary duplicate header shortcuts. Test open menus, notices, review dialogs and product actions at narrow widths.
Reduce large headings/padding in your editor. Use responsive visibility controls for an alternate mobile section where available instead of squeezing a desktop-only composition into a phone.
The bottom bar appears below 992px and is hidden on cart and checkout pages. It is website navigation, not a native app.
Screenshot 12. Configure the mobile bottom barOpen Header & Navigation → Mobile navigation. Enable the bar, choose whether labels are visible, and select up to five destinations. Save, then test below 992px. The bar is intentionally hidden on cart and checkout pages.Open full-size screenshot ↗
12. Products, cards & filters
Create products with prices, inventory, descriptions, featured images, galleries, categories and attributes. Configure variations in WooCommerce for variable products.
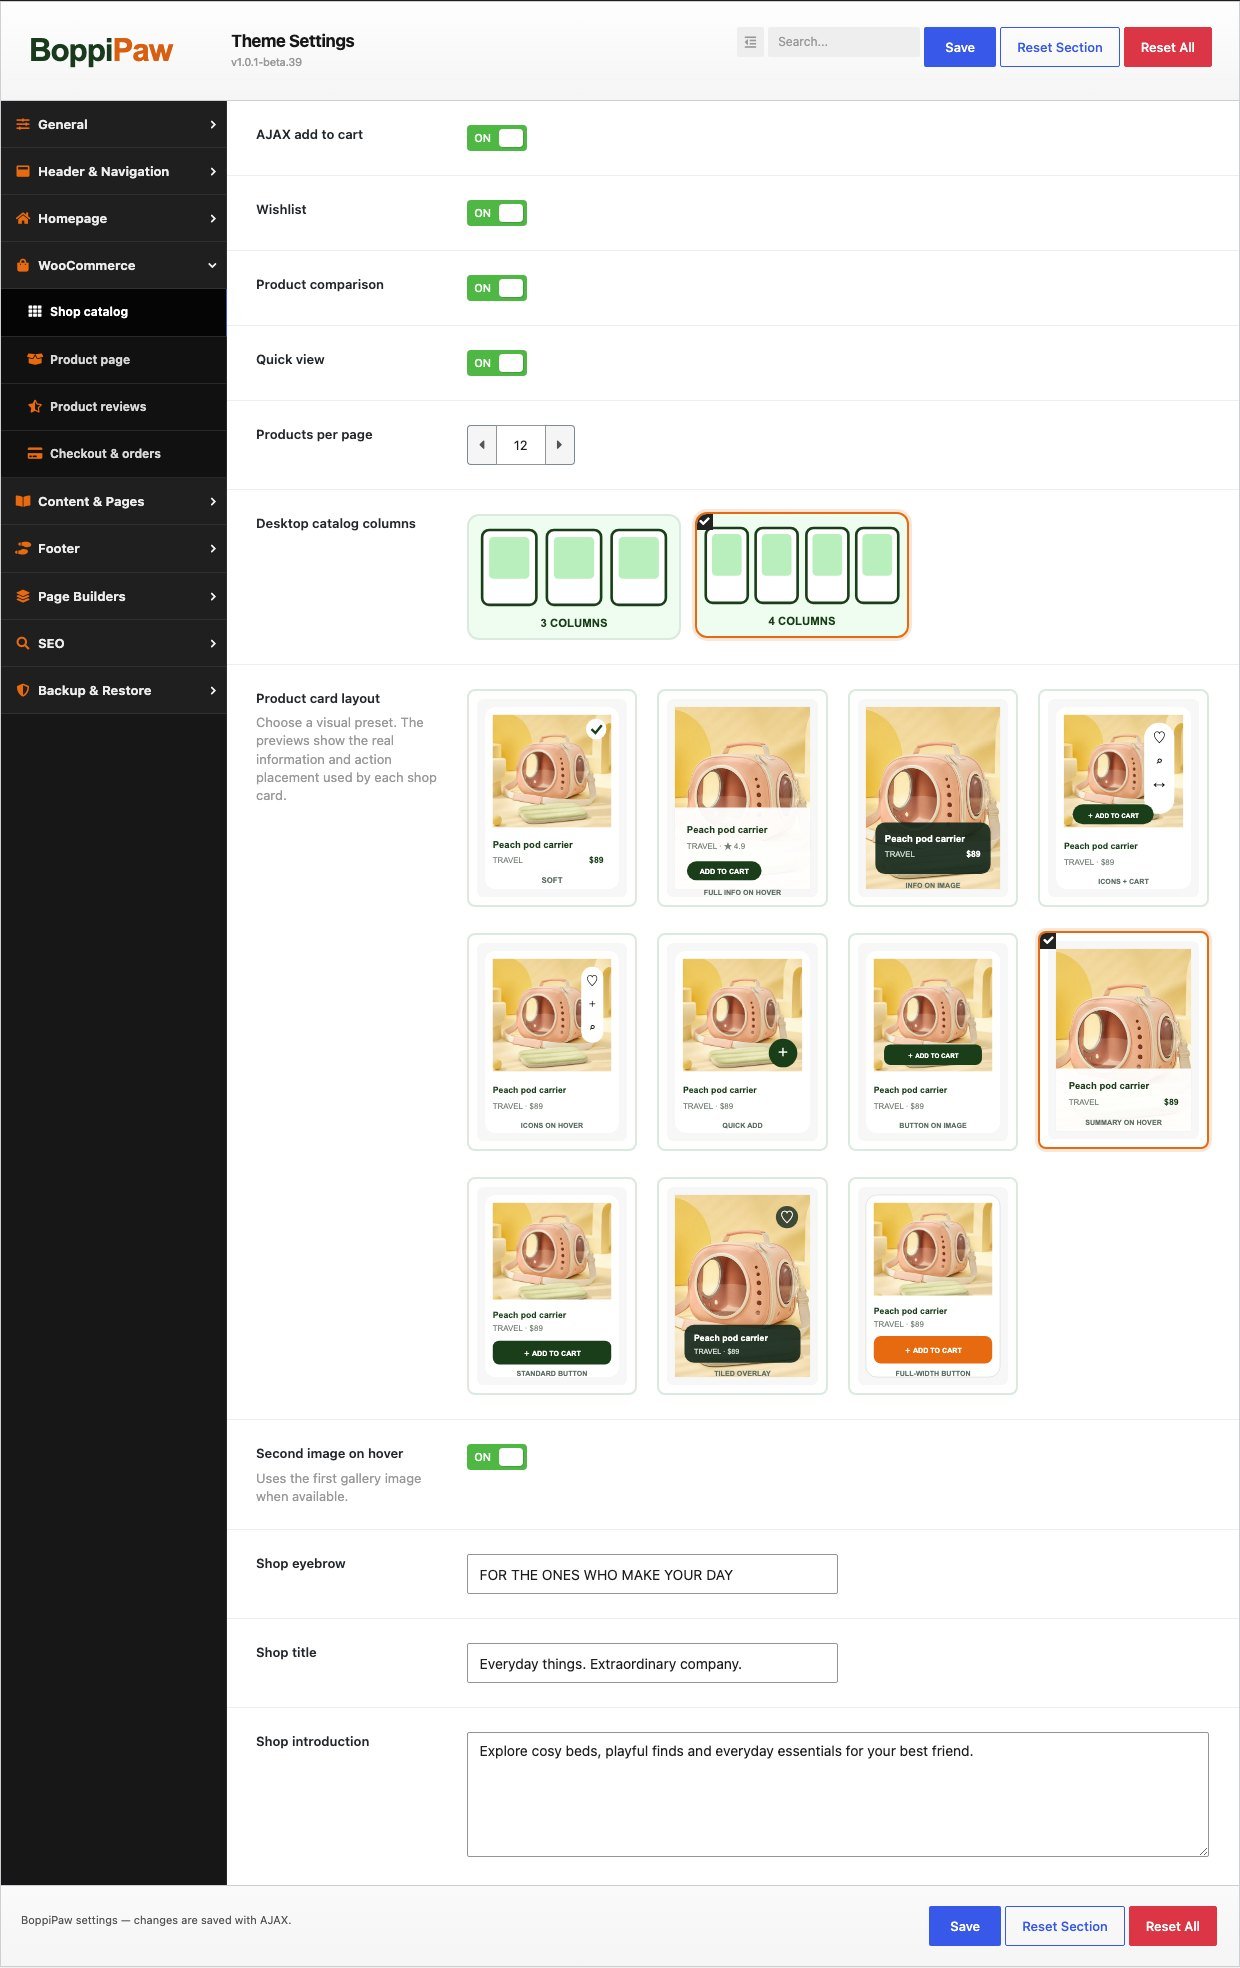
Under Theme Settings → WooCommerce → Shop catalog, select among 11 card presets, desktop columns, products per page and second-image-on-hover behavior.
Review Product page settings for layouts, gallery thumbnails, related products and benefit text. Individual products can override supported layouts.
Prepare real catalog data before filtering. Category, price, in-stock, sale and brand controls depend on catalog data; brands require the product-brand taxonomy and terms.
Test combinations, sorting, empty results and reset. Mobile filters use a left-side drawer. Builder grids can use their own queries and are not automatically the shop archive.
Replace sample shipping/returns/safety claims with your own terms. Benefit text does not configure shipping rules or certify products.
Screenshot 13. Choose cards and catalog behaviorOpen WooCommerce → Shop catalog. Configure the shopping tools, columns and card preset, then Save. Test a long product title, sale price and the state after adding to cart on a narrow screen—not only the initial desktop card.Open full-size screenshot ↗
13. Wishlist, comparison & quick view
Enable these under Theme Settings → WooCommerce → Shop catalog. Keep WooCommerce and supporting Core functionality active.
Wishlist: save from cards and revisit the dedicated wishlist page. Check guest and signed-in behavior.
Comparison: select up to four products and open the side-by-side comparison page. Populate product attributes to make comparison useful. Test removal and clearing.
Quick view: inspect a product from its card. Test simple and variable products separately; required choices still apply.
Confirm imported wishlist/compare pages and navigation links exist. A manually created page containing only a title is not a configured collection page. Test AJAX add-to-cart feedback and card layout after adding a product.
14. Reviews & customer media
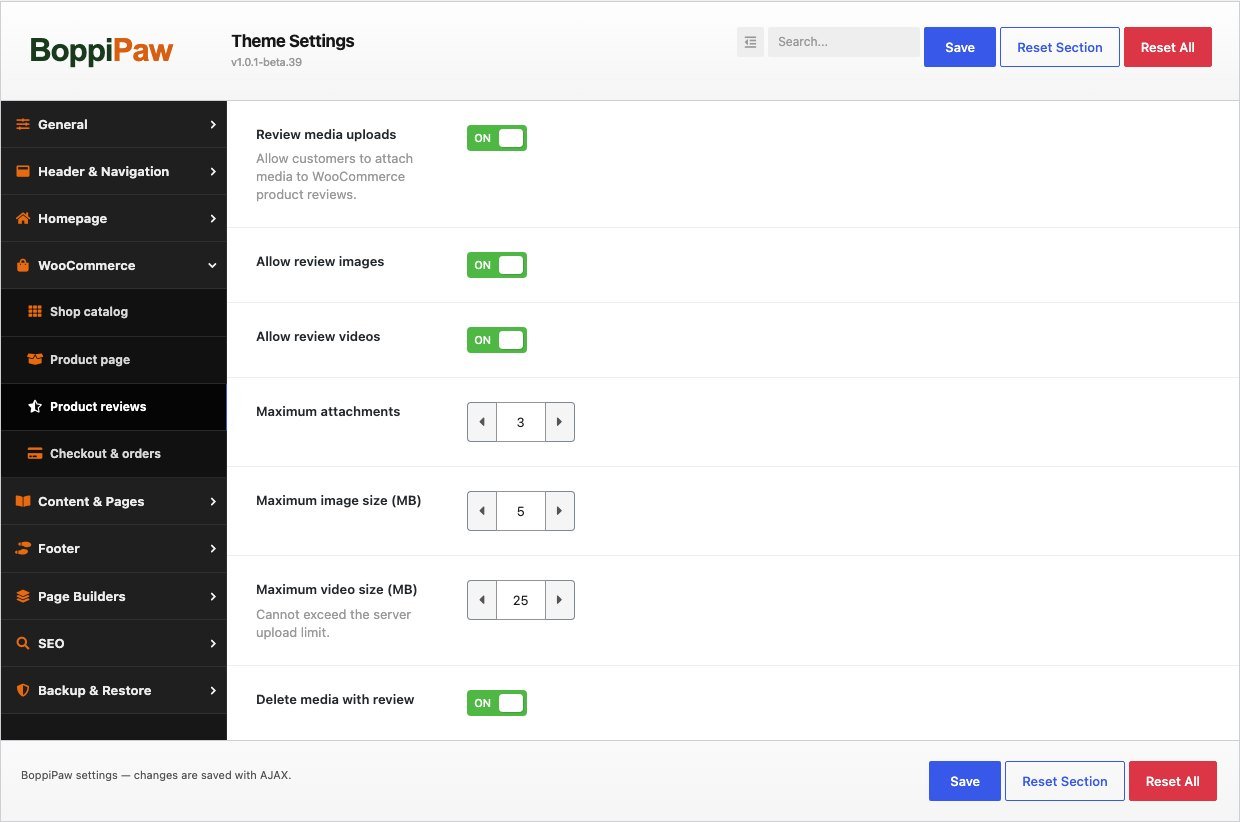
Enable review/rating rules in WooCommerce, then configure Theme Settings → WooCommerce → Product reviews: images/videos, attachment count, file-size limits and deletion with reviews. Server upload limits still apply.
Submit a test review using a customer permitted by your WooCommerce rules.
Moderate it in WordPress and confirm that counts, rating summary and list agree with approved data.
Test invalid uploads and long forms on mobile, including scrolling, validation and closing the dialog.
Do not present sample ratings or marketing testimonials as verified reviews. Accuracy and moderation remain the merchant’s responsibility.
Screenshot 14. Set review attachment limitsOpen WooCommerce → Product reviews. Enable only the media types you want and set attachment/size limits within your server limits. Save, then check a review submission and its moderation workflow.Open full-size screenshot ↗
15. Journal, blocks & sliders
Use WordPress Posts for the journal, with featured images, excerpts and categories. Select the posts page in Settings → Reading; adjust its introduction in Theme Settings. Replace sample articles before launch.
HTML Blocks supply reusable footer/menu content. Publish before assigning. Slides supplies slider content; edit images, text and links and select the appropriate slider in the page component. Check mobile cropping and text placement.
Core owns these custom content types and components. Changing themes does not convert them to ordinary pages. Keep Core active to retain access to its registered content types; back up data before removing plugins.
16. Newsletter & cookie information
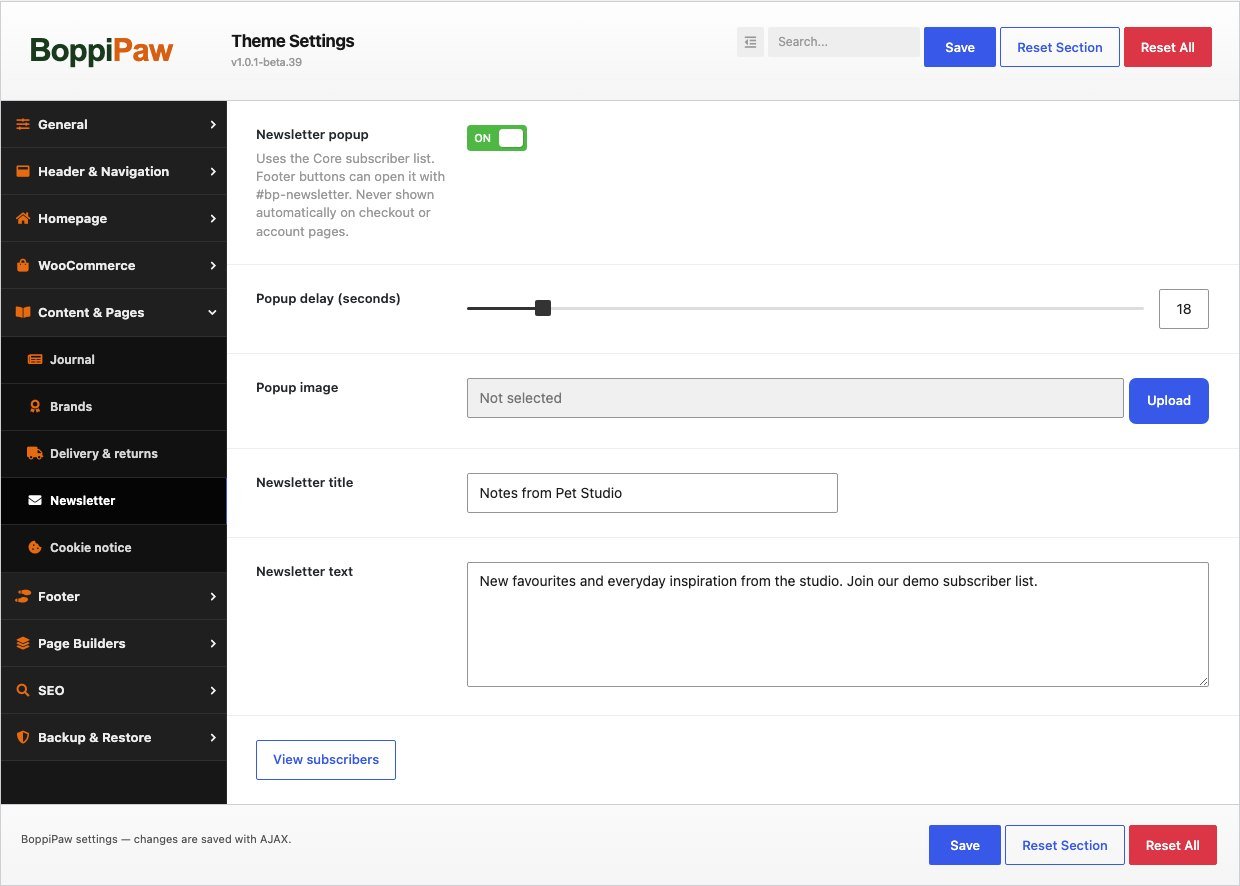
Under Theme Settings → Content & Pages → Newsletter, enable the popup and configure delay, image and copy. Use the subscriber-list link to inspect Core records. A button linking to #bp-newsletter can open signup. Automatic popups are suppressed on checkout and account pages.
Subscriber collection is not a complete email-campaign service. Arrange your mailing workflow and suitable signup wording separately; test records and feedback before inviting subscriptions.
Enable the Cookie notice and assign a published privacy policy in Settings → Privacy if needed.
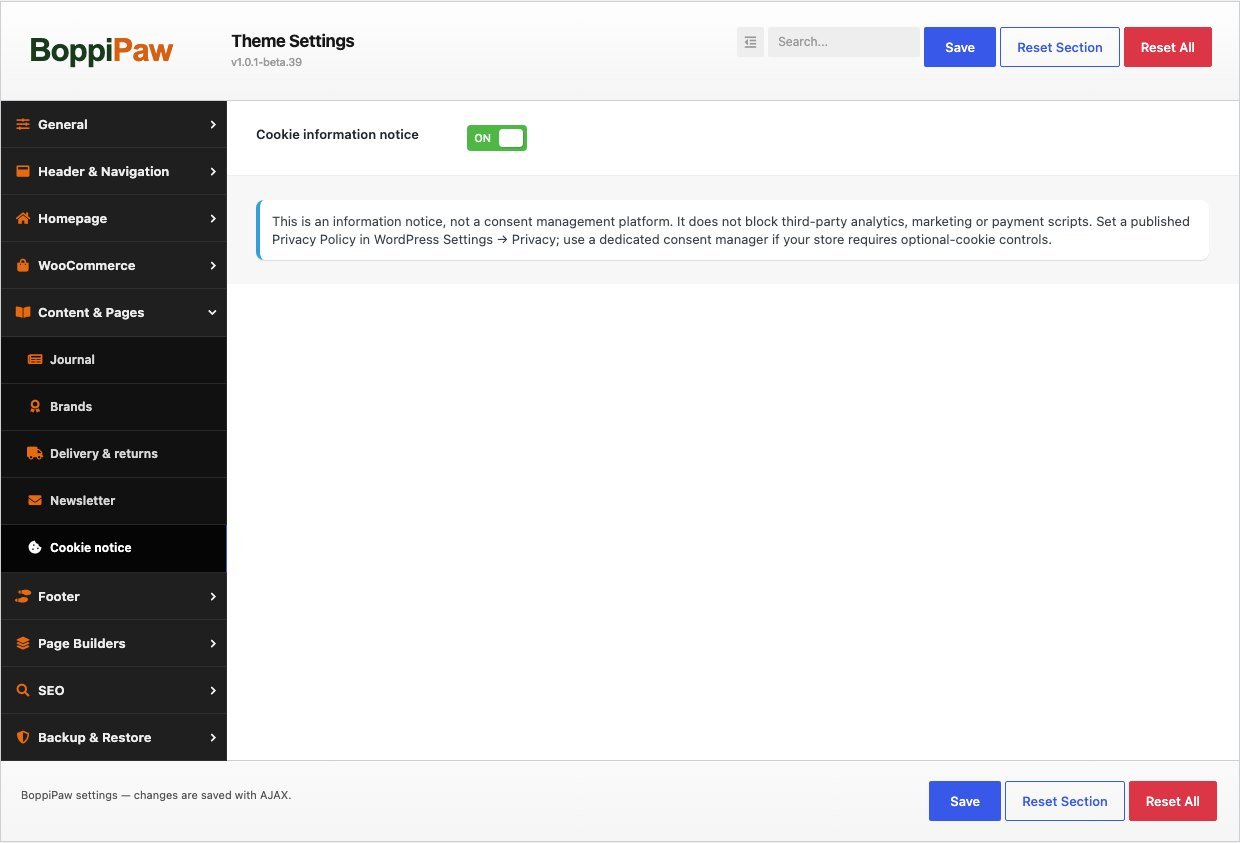
This is an information notice, not a consent management platform. It does not block analytics, marketing or payment scripts. Use an appropriate consent solution when optional-cookie controls are required; enabling a notice alone does not establish compliance.
Screenshot 15. Set up the newsletter popupOpen Content & Pages → Newsletter. Enable the popup, set its delay, image and text, then Save. Test in a fresh browser session because dismissal state can prevent repeated display.Open full-size screenshot ↗Screenshot 16. Configure the cookie information noticeOpen Content & Pages → Cookie notice and enable the notice if required. Publish and assign a Privacy Policy under WordPress Settings → Privacy. This notice is not a consent manager and does not block optional scripts.Open full-size screenshot ↗
17. SEO & translation
Theme Settings includes fallback titles/descriptions, indexing, social sharing and organization schema. WordPress supplies canonical URLs/sitemaps and WooCommerce supplies Product schema. Supported SEO-plugin detection suppresses overlapping theme metadata; inspect the final page for duplicates when configuring another SEO system.
Theme and Core include translation templates with separate text domains: boppipaw and boppipaw-core. Translate both through the standard WordPress workflow. Pages, menus, products and builder text need separate translation. Translation-ready does not mean automatically translated or a complete multilingual commerce solution.
Exports settings values. Import replaces current values; it does not copy pages, products, menus or media files.
Header Builder export/import
Transfers header configuration. Check default selection and destination block/media references.
Footer Builder export/import
Creates a new draft. Check nested blocks, media and menus before publishing/applying.
Tracked demo removal
Uses importer records. Not a database snapshot or full backup.
Hosting/backup tool
Use for complete database, uploads, themes and plugins, with a tested restore procedure.
Export before importing/resetting. Check cross-site IDs and URLs even when a visual template imports successfully.
19. Update safely
Back up files/database, read release notes and test on staging.
Use authenticated WordPress updates when offered, or upload the official installable package manually and review its replacement confirmation.
Update the matching Core package through the supported plugin workflow. Verify version and active status.
Clear relevant caches, regenerate Elementor assets if needed and check key storefront interactions.
Older development versions named 1.0.1-beta.* compare higher than formal 1.0.0. Do not expect a normal automatic-update prompt for that transition. Back up and use deliberate manual replacement, checking the theme directory and child-theme relationship.
Keep customizations outside parent-theme files. Updates do not automatically reimport demos, replace published builder content or configure merchant services.
20. External services & images
License activation and authenticated downloads contact the Ryncode licensing service. Plugin installation/updates contact their providers. See bundled PRIVACY.md for service and data details.
The installable theme includes placeholder demo imagery and local branding/interface assets. Optional original-image download contacts boppipaw.ryncode.com and saves assets to your media library. The importer verifies its supported manifest and file hashes. Leaving the option unchecked avoids that image-server request.
Online preview imagery is not embedded in the customer theme ZIP. Use images you are entitled to publish and review bundled asset credits/license information.
21. Troubleshooting
Installation says style.css is missing
Extract the full download and upload the installable theme ZIP inside it, not the outer documentation bundle.
A plugin still asks to update
Check its installed version/status, the offered package, filesystem permissions and the actual installer error. Repeated clicks do not fix a failed or mismatched download. Include the exact error when requesting help.
Import stopped or images are placeholders
Read progress/error output, use available resume controls and check outbound access, memory/time limits and disk space. Placeholders are expected when original-image download was not selected. Do not switch that choice during resume.
Header/footer did not change or appears twice
Check site defaults, page overrides, publication status and Elementor Theme Builder locations. Resolve competing assignments rather than deleting templates to test priority.
Fonts or backgrounds are inconsistent
Inspect global Theme Settings, preset, Elementor inheritance and local section/widget overrides. Regenerate builder CSS and clear relevant caches after correcting the source setting.
Wishlist, compare or quick view does not respond
Check feature switches, WooCommerce/Core, collection pages and product data. Inspect JavaScript errors and test without script-delay/minification on staging. Avoid caching personalized commerce responses incorrectly.
A page returns 404 after import
Check publication and site-local URLs. Resave WordPress permalinks and inspect server rewrite rules if the problem persists.
What should I send with a support request?
Include theme/Core/WordPress/WooCommerce versions, URL, device width, reproduction steps and screenshot/error excerpt. Redact purchase codes, customer data and payment secrets. Never post credentials publicly.
22. Before you launch
Replace sample branding, contacts, policies, products and claims; verify every menu/footer link.
Check plugins, builder assignments and applicable licenses.
Review homepage, shop, product, search, account, wishlist, compare, cart and checkout on desktop and a real phone.
Test filtering, sorting, variations, cart updates, empty states, reviews and newsletter submissions.
Configure and independently test payments, shipping, taxes, transactional email and refunds with your providers.
Publish business policies and configure any required consent solution.